×
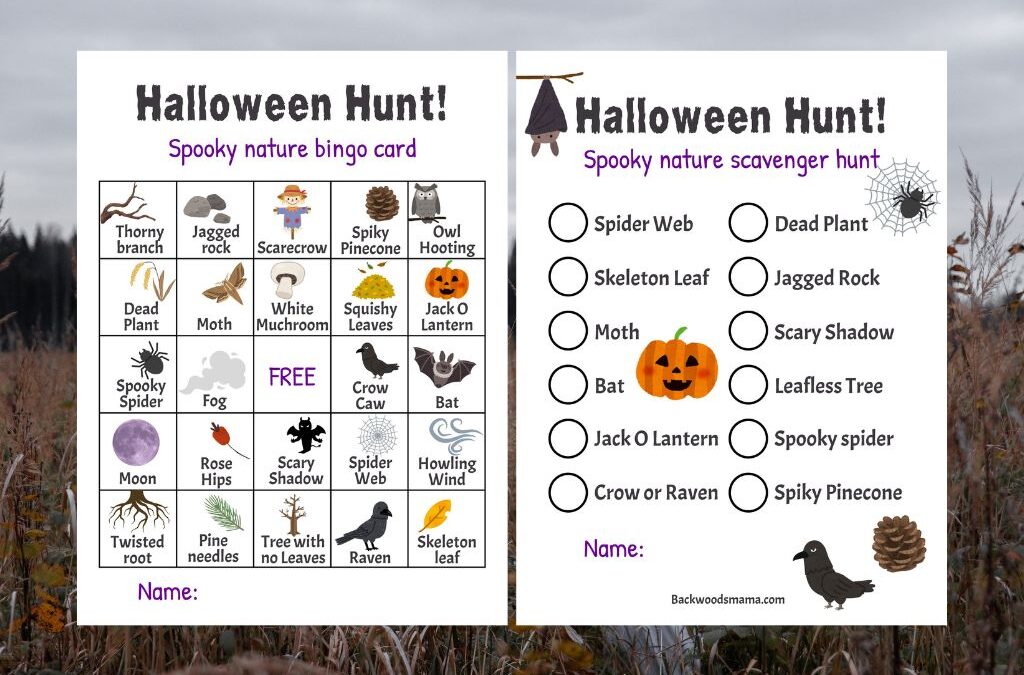
Halloween Nature Scavenger Hunt & Bingo (Free Printables!)
Halloween is here, along with all the spooky, magical things happening in nature as fall deepens. Spiders creep into cozy corners, webs glisten...

Nature crowns are a little bit of magic. Weaving branches, flowers, leaves, and tiny bits of green into a crown invites kids to connect with the land, build fine-motor skills, and jump straight into imaginative outdoor play. Best part? This version is made from 100% natural materials—play hard, then compost.
Updated on August 19, 2025. This post was originally published in 2019 and now includes fresh photos, clearer steps, and harvesting tips.
Nature crowns come in all shapes and sizes, and my favorite thing is they’re made from 100% nature—no fake flowers, no wire, no plastic—just branches, leaves, and blooms. Willow is especially great: it’s wonderfully bendy so kids can shape it into a circle without any hardware, the fresh weave holds its form and makes little pockets for tucking in flowers and leaves, it sits comfortably once you trim any scratchy ends, and when the play is done you can snip out any non-natural bits (like a ribbon from a special day) and pop the whole crown into the compost—easy on the earth, easy on cleanup, and pure magic. If you’ve got willow near ponds or streams, it’s a quick gather, a quick make, and a big dose of wonder.

Ribbon is pretty! On special occasions, my children we will weave ribbons into their nature crowns. We just make sure to remove the ribbon (and reuse it!) before composting the crown.
Note on ribbons: Pretty is welcome! If you add ribbon, just pull it out and reuse it before composting the crown.
A weeping willow is a deciduous tree you’ll often find near water—lakes, ponds, streams—across much of North America, Europe, and parts of Asia. Its fountain-shaped canopy hangs with long, slender branches and narrow green leaves that drift right down toward the ground. Those fresh, bendy branches are exactly why willow makes such a great base for a nature crown: they’re flexible, easy to weave, and comfy to wear once you trim any pokey ends.
You only need one or two fresh, pencil-thick branches for a child’s crown. Start by checking the ground for windfall. If you do need to harvest, snip a small piece from an outer hanging branch (with permission where needed), avoid large cuts, and follow local rules. Take just what you’ll use.

No problem. Grapevines are a perfect stand-in, as are other fresh, bendy options like young poplar/dogwood shoots, or a simple braid of long grasses as your base. Fresh (green) material works best; if your vines are a bit dry, soak them in warm water for 20–30 minutes to bring back the flex.
Kids learn to love nature by touching, gathering, and making, so let’s do it in a way that benefits both children and the natural world.
Take just a little from any one spot—think a pinch here and there, not a handful. Choose common, fast-regrowing plants (like dandelions, grasses, yarrow, fresh willow tips) and skip anything rare or slow to recover. Snip small pieces cleanly; don’t pull up roots or strip bark. Avoid protected parks, nature reserves, and private property without permission, and always follow local rules. If you can’t confidently identify a plant as safe to handle, leave it out. Wash hands after collecting, and leave plenty behind for pollinators and wildlife.
Little helper tip: Fresh (green) willow is the most flexible. If your branches feel dry, a 20–30 minute soak in warm water brings back the bend.


Halloween is here, along with all the spooky, magical things happening in nature as fall deepens. Spiders creep into cozy corners, webs glisten...
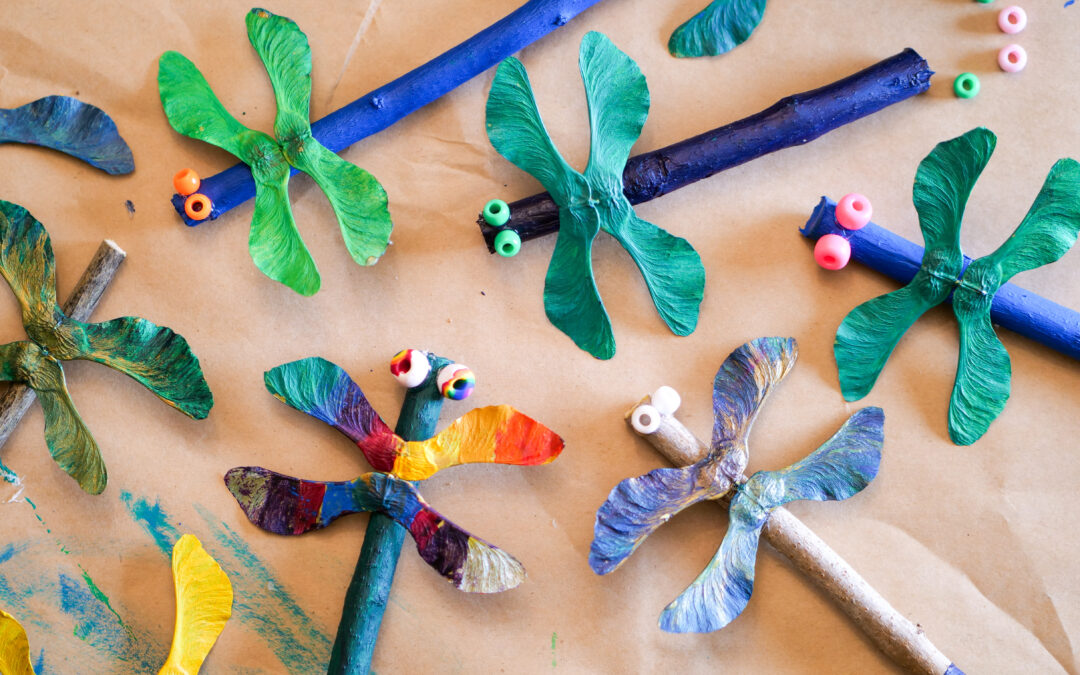
Maple Seed Dragonfly Nature Craft From spring well into fall, maple trees are bejeweled with curious winged seeds. Botanically, they’re called...
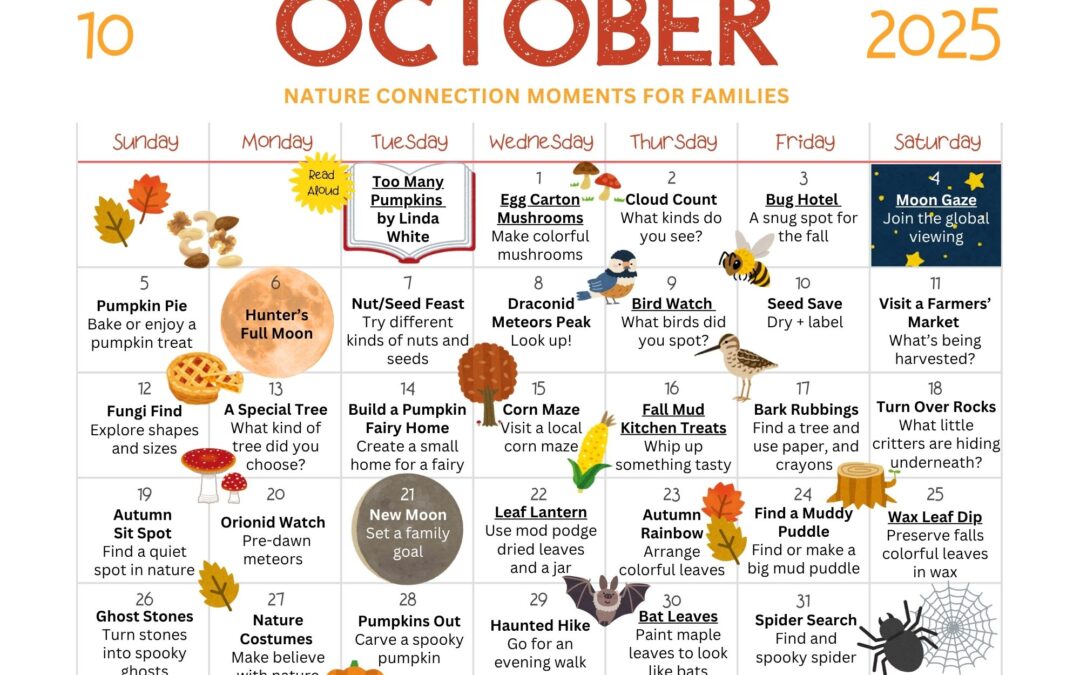
Hello, October! The light turns honey-gold, leaves crunch underfoot, and the air smells like rain and woodsmoke. October invites us to lean into...
Hello,
I bit of a random question. Could I use one of your images of the making of a flower crown.
I am planning to run a workshop and I do not have a suitable image.