×
May 7, 2025How to Whittle Gnome Garden Markers: A Beginner’s Guide for Parents & Kids

Whittling is often considered an adult-only activity—after all, handing a sharp knife to a child might seem risky or even downright crazy. But historically, whittling is exactly how older generations safely introduced children to responsible knife handling and craftsmanship.
Whittling helps children develop fine motor skills, boosts confidence, and sparks creativity, making it an enriching hands-on activity for families. With just a little basic knowledge, clearly outlined safety tips, the right tools, and attentive supervision, children as young as five can safely explore the rewarding art of whittling. In this beginner-friendly tutorial, I’ll guide you step-by-step through making charming gnome garden markers, using simple, accessible materials.
My hope is that you’ll feel confident sharing this traditional skill with your own kids at home.
This article was originally published in Tanglewood Hollow’s The Simple Living Collective (2022) and later in the Wild Family Guide (Spring ’24). I’ve excited to finally share this fun, family-friendly project here on Backwoods Mama—so let’s dive in!
This post may contain affiliate links. As an Amazon Associate, I earn from qualifying purchases. This means I may earn a small commission if you click through and make a purchase, at no additional cost to you. Thank you for supporting this blog!
Whittling Safety Basics: What Parents Need to Know
A Quick Word About Safety
Allowing your child to use a knife naturally involves some risk but that’s not necessarily a bad thing. Engaging in supervised, risky play, such as using knives, axes, or building fires, helps children develop critical life skills, confidence, and responsibility. However, it’s important to balance this freedom with proper safety measures. When teaching your child to whittle, consider these key safeguards:
Choosing the Right Knife
Putting a knife in your child’s hands might feel intimidating, but choosing a suitable knife makes the experience safer and more enjoyable:
- Right size: The knife handle should fit comfortably in your child’s hand, allowing them to easily wrap their fingers around it for better control.
- Fixed blade: A fixed blade (rather than a folding one like a Swiss Army knife) provides better stability and safety.
- Sharp blade: It might seem counterintuitive, but as the saying goes, “a dull knife is a dangerous knife.” Sharp knives require less force and are easier to control, greatly reducing the risk of accidents.
For younger children, consider these additional safety features:
- Rounded tip: Ideal for beginners, as it reduces the risk of accidental puncture wounds.
- Finger guards: Prevent little fingers from sliding onto the blade. These are great for young beginners but might limit detailed work as skills advance.
Recommended Knives
A Sloyd knife, featuring a short fixed blade and wooden handle, is my top recommendation for teaching children. Its design is safe, comfortable, and easy for small hands. Younger beginners may benefit from a scout-style knife with a rounded tip. Trusted brands like BeaverCraft or Flexcut offer great options for beginners.
Whittling Gloves: Helpful or Not?
A whittling glove is a cut-resistant glove worn on the hand holding the wood. It’s useful for preventing small cuts, especially when children first learn to whittle. While gloves can add extra safety for beginners, some children find them uncomfortable or restrictive as they grow more confident. Ultimately, whether to use a glove depends on your child’s comfort and skill level.


Setting Up a Safe Whittling Space
In our home, “sitting while whittling” is a key rule. To minimize the risk of accidents, your child should sit calmly and comfortably in a safe space while whittling. Outdoors is ideal for easy clean-up, though a suitable indoor space works too.
Teach and Supervise
For young or beginner whittlers, constant supervision is essential. Good instruction and close supervision help your child build safe, effective whittling habits from the start.
Keep a First-Aid Kit Handy
Even with careful supervision and instruction, minor cuts can occasionally happen, often once children grow more confident and perhaps a bit less cautious. Always have a well-stocked first-aid kit nearby, and familiarize yourself with basic first-aid for minor cuts.

How to Make Garden Gnome Markers
Now it’s time to start whittling! These delightful garden gnome markers are perfect for beginners. They’re easy, customizable, and fun even for children who already have some whittling experience. Before beginning, read through the tools, materials, recommendations, and cutting techniques below.
Tools and Materials
- Whittling knife (Sloyd or scout style)
- Hand saw (pruning saw, hacksaw, or pruning loppers)
- Wood branches (½–1 inch in diameter, at least 10 inches long)
- Sandpaper
- Paintbrush
- Acrylic paints (white, red, yellow, blue, green etc.)
- Permanent marker (fine tipped)
Helpful Recommendations
- Whittling knife: My go-to choice is a Sloyd knife, featuring a short fixed blade and easy-to-grip wooden handle. For younger children, a scout knife with a rounded tip is ideal. Brands like BeaverCraft, Flexcut, and Opinel offer reliable options.
- Hand saw: A pruning saw quickly cuts small branches for this project, though hacksaws, bone saws, or pruning loppers also work well.
- Wood sticks: Choose branches approximately ½ to 1 inch thick and about 10 inches long. Freshly cut or fallen branches are best, as older, dry wood can be hard to whittle. If you don’t have suitable wood at home, check with neighbors or local arborists.
Cutting Techniques
For this beginner project, we’ll focus on two simple cuts: the basic push cut and the thumb push cut.
The Push Cut: Your child holds the wood in their non-dominant hand and the knife in their dominant hand. Grip the knife firmly or place the thumb on the blade for extra control. Make smooth, long cuts away from the body.

The Thumb Push Cut: Similar to the push cut, but your child places their thumb from the non-dominant hand on the back of the blade for increased control and power.

Let’s Make Gnome Garden Markers!
Now it’s time to start whittling! These delightful garden gnome markers are perfect for beginners. They’re easy, customizable, and fun even for children who already have some whittling experience. Before beginning, read through the tools, materials, recommendations, and cutting techniques below.
Step 1: Get Set Up
Gather all the listed tools and materials and create a comfortable whittling area, indoors or outdoors.
Step 2: Safe Seating and Holding Techniques
Have your child sit on a sturdy chair or stump, with feet firmly on the ground. Resting forearms on knees ensures the knife clears their legs. If you’re concerned about safety, encourage your child to whittle towards a stable surface such as a wooden stump, an old board, or a sturdy cutting board.
Older children might prefer free whittling, leaning forward slightly with knees apart, always ensuring legs are safely positioned away from the cutting path.
Demonstrate a firm grip on the knife handle with the dominant hand. Using the thumb along the blade’s spine is optional for better control. Hold the stick’s base firmly in the non-dominant hand.
Step 3: Whittle the Gnome’s Hat
Using the push cut, have your child remove bark and wood from the top inch of the stick, gradually turning it to form a pointed hat. Older children can enhance the shape by adding a beveled edge using the thumb push cut.

Step 4: Peel the Bark to Create the Beard
Starting about two inches below the hat, have your child carefully peel off bark using the push cut to form a distinctive beard. Beards can be any shape—let creativity lead!

Step 5: Create Space for the Label
Turn the stick 180 degrees. Starting about two inches from the base, use the push cut to remove another section of bark. This area will be used to label garden plants (peas, carrots, potatoes, etc.).

Step 6: Let the Sticks Dry Overnight
Place your gnome markers in a warm, dry spot overnight until fully dry to the touch. If your child is eager to move ahead, you can skip drying and sanding, proceeding directly to painting.

Step 7: Sand the Whittled Wood
Show your child how to gently sand the exposed whittled wood, avoiding the bark. Sanding creates a smooth surface for painting and helps children learn another handy skill.

Step 8: Paint Your Gnome
Acrylic paints are best for outdoor durability. Invite your child to paint the beard white and choose any favorite color for the hat.

Step 9: Add Final Details
Using a fine-tip permanent marker, your child can add two small eyes and write the garden plant label clearly on the exposed area. You might first lightly sketch the label with pencil to ensure it fits nicely.

Step 10: Let’s Be Gnomies!
Congratulations—your child has created their first garden gnome marker! Gnomes love company, so encourage your child to craft more to populate your garden or gift to friends and family.


Categories:
Recent Posts:

Why We Need to Be Wild: Book Review and Reflection
“It’s a fox!” Not a live fox, but a furry orange lump lying on the side of the highway, eagerly (and illegally) rescued from its irreverent roadside...
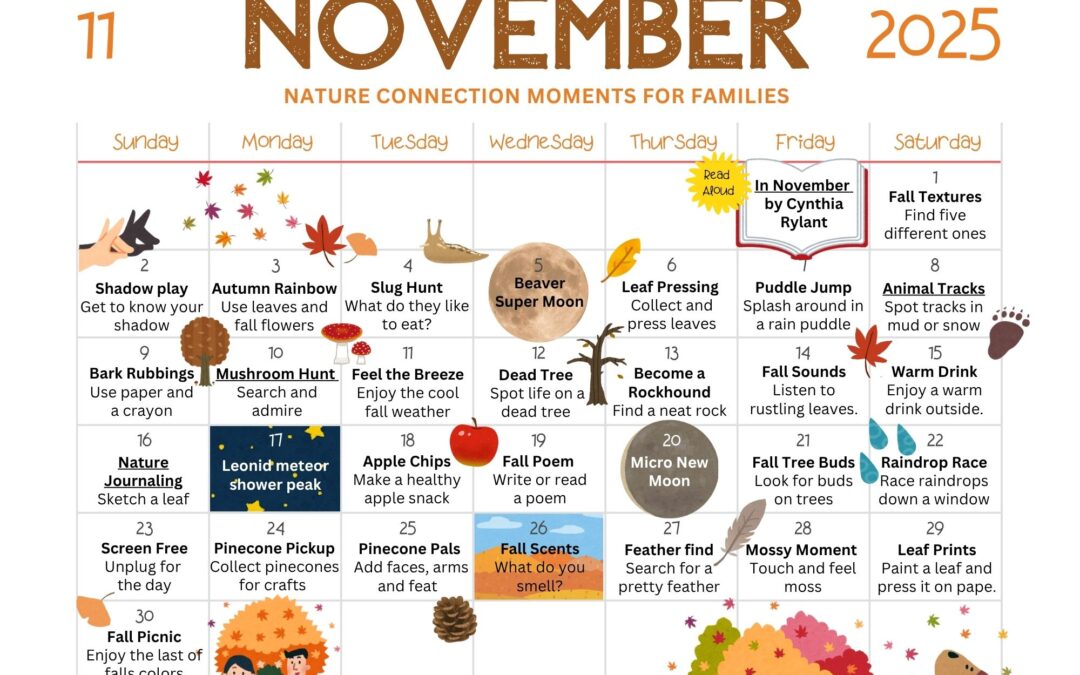
November 2025 Nature Connection Calendar for Families
Hello, November! November holds a special place in my heart. It used to be one of my least favorite months, the beauty of early fall fading, the...
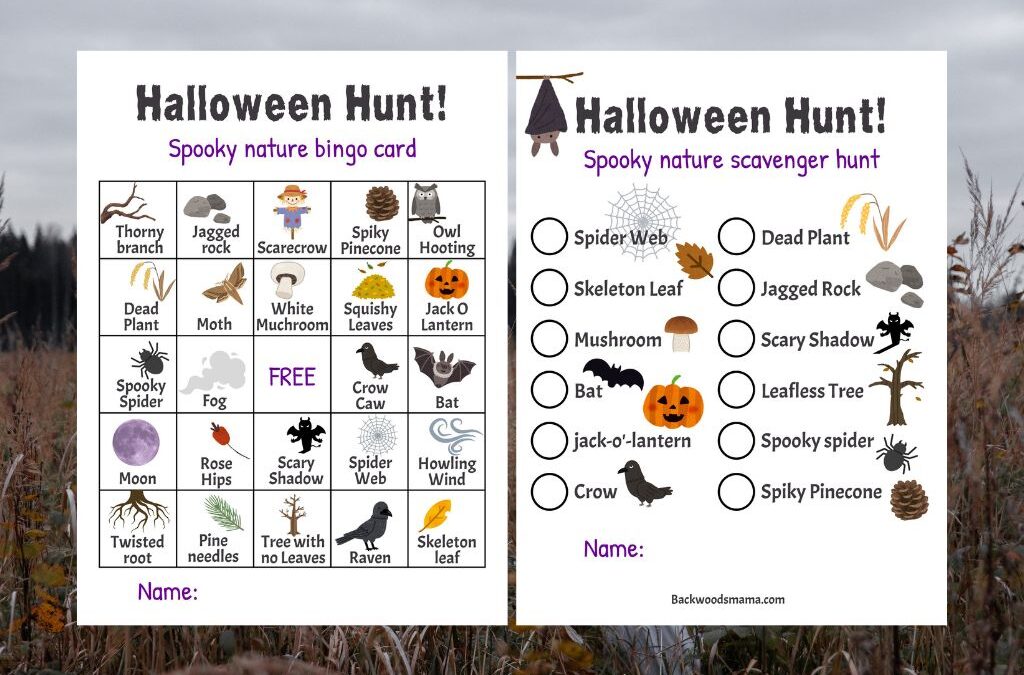
Halloween Nature Scavenger Hunt & Bingo (Free Printables!)
Halloween is here, along with all the spooky, magical things happening in nature as fall deepens. Spiders creep into cozy corners, webs glisten...
0 Comments